
What is Kubernetes and what is it for?
Kubernetes - this is a system to automated management of containerized applications. This is a system which was developed for automated deployment, scaling and coordinating containers in cluster. With Kubernetes, you can maximize utilization of compute resources in your cluster.
The main features, provided by Kubernetes:
- Automated rollout and rollback
- Rolling updates
- Service discovery and load balancing
- Resource scheduling
- Auto scaling
- Self-healing
- Storage orchestration
- Secret and configuration management
As shown in this list, Kubernetes automates the application lifecycle and simplifies maintenance.
Deployment and scaling without Kubernetes
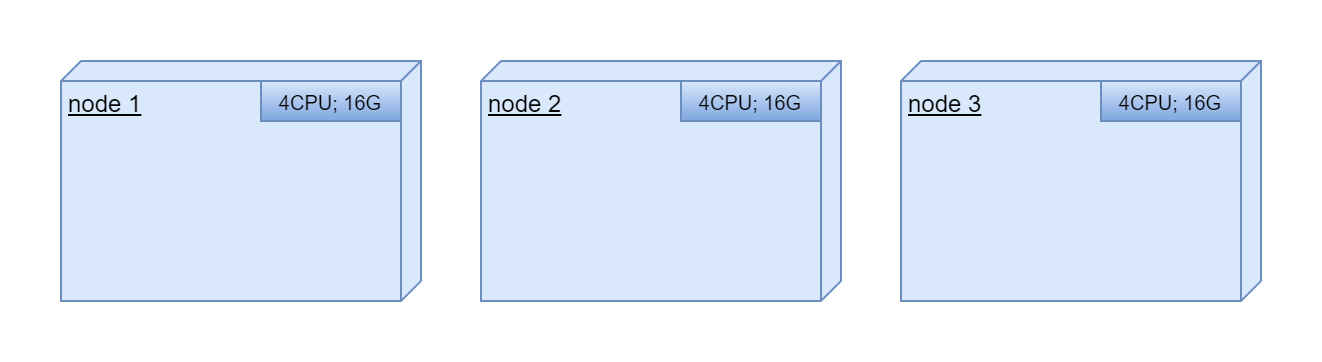
Let's look at en example where we have 3 powerful computing nodes:
We are trying to deploy tree application in these nodes. All application are in docker containers:
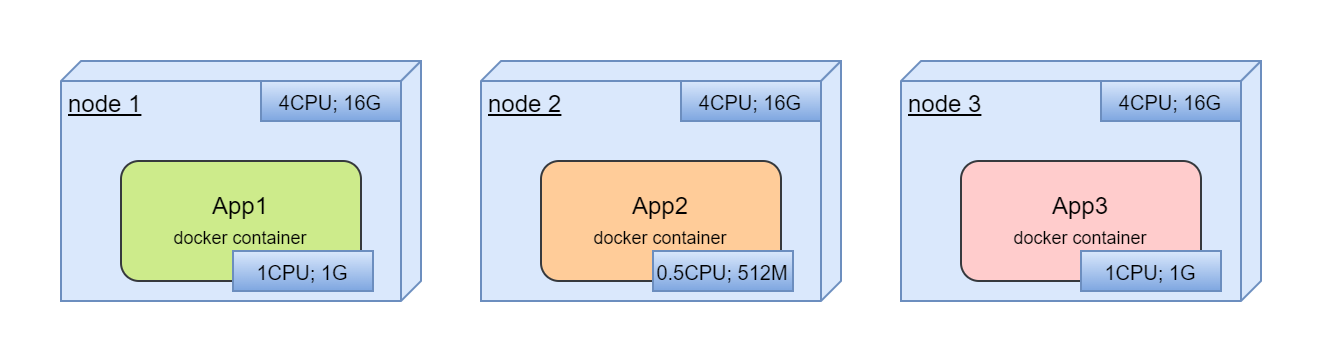
In deployment process we should choose which containers are located in which node. We should deploy containers in different nodes separately.
Next step, we are trying to deploy new application:
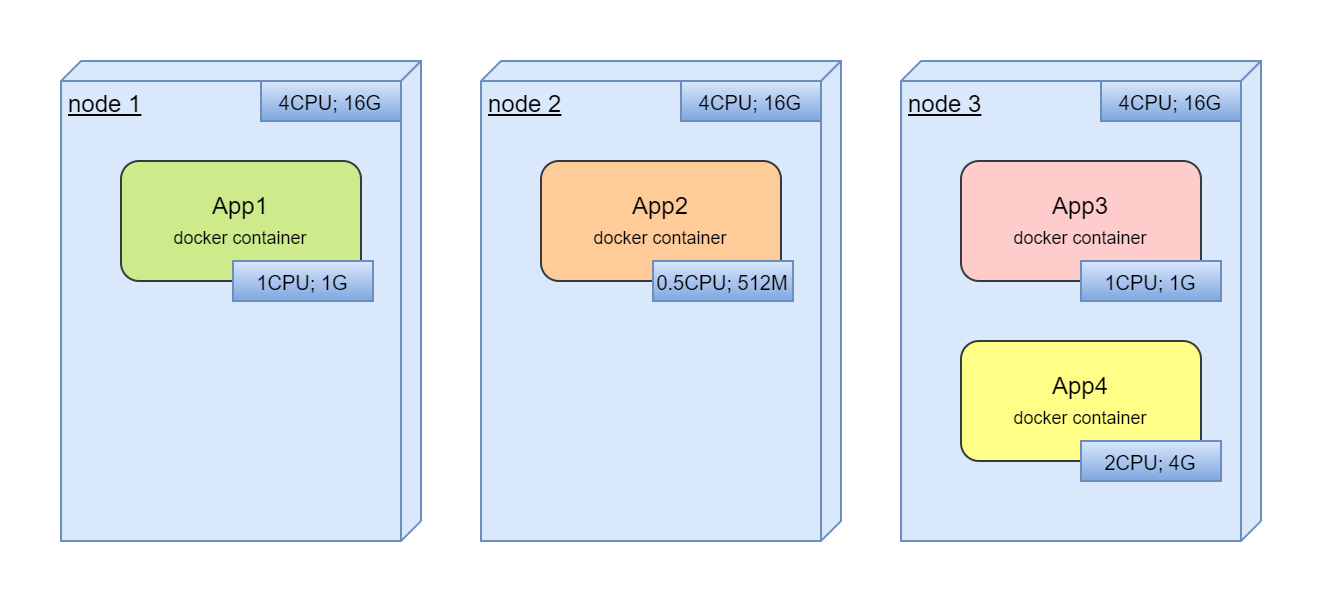
Here, we should find free resources for new application.
Finally, as it usually happens, we are trying to utilyze all resources and deploy new application or scale existing:
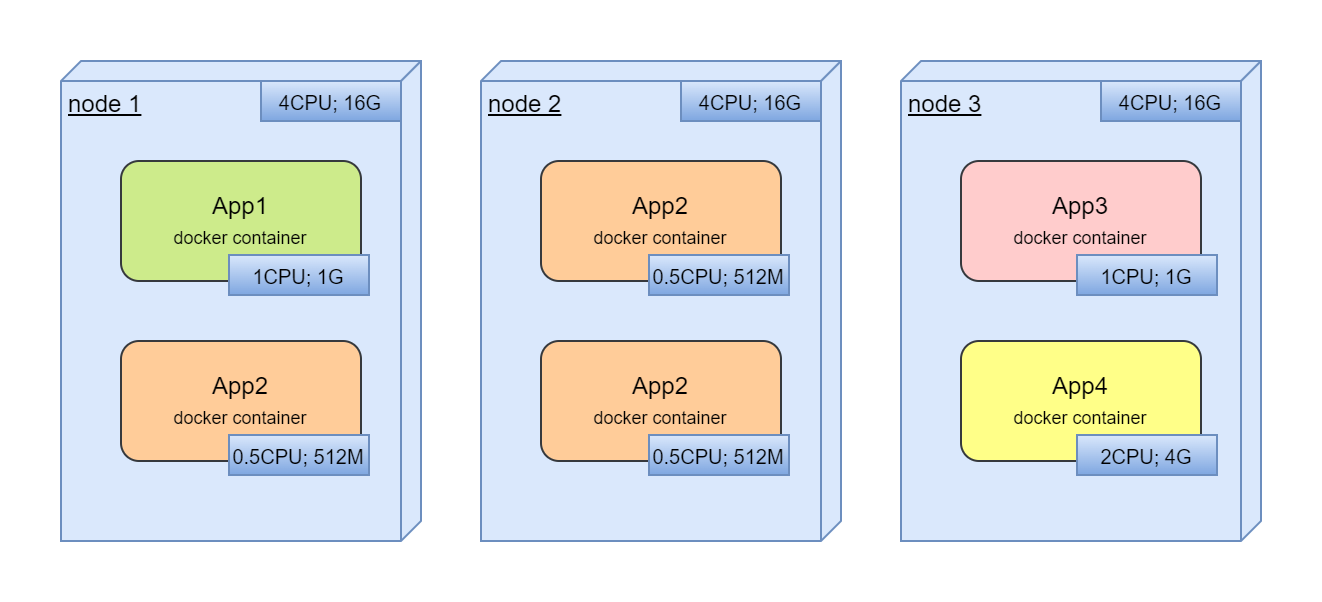
And, already manual management of free resources. But what if, we deployed it not optimal and when all services already are in production, we are trying to move services between nodes to optimize utilization?
The main problems:
- Resource allocation for new or scaled container
- Scaling
- We have to organize the life cycle of the container ourselves
- Optimizing resource usage
- Health checks
It's interesting here that in real life we will have one service per node with horrible resource utilization:
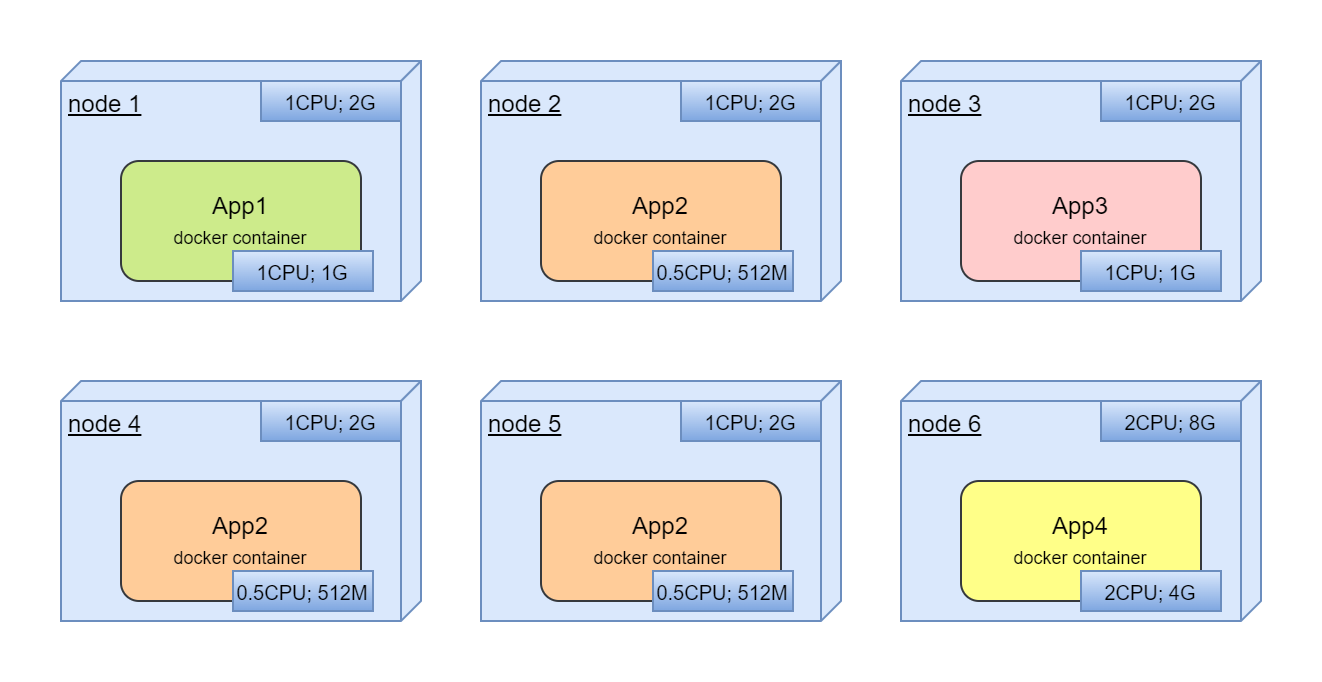
This is a very solid, clumsy system that does not utilize computing resources well and is extremely difficult to optimize.
How Kubernetes works?
We have very simple abstraction on top of all our compute resources.
For the services from the above example, here we have:
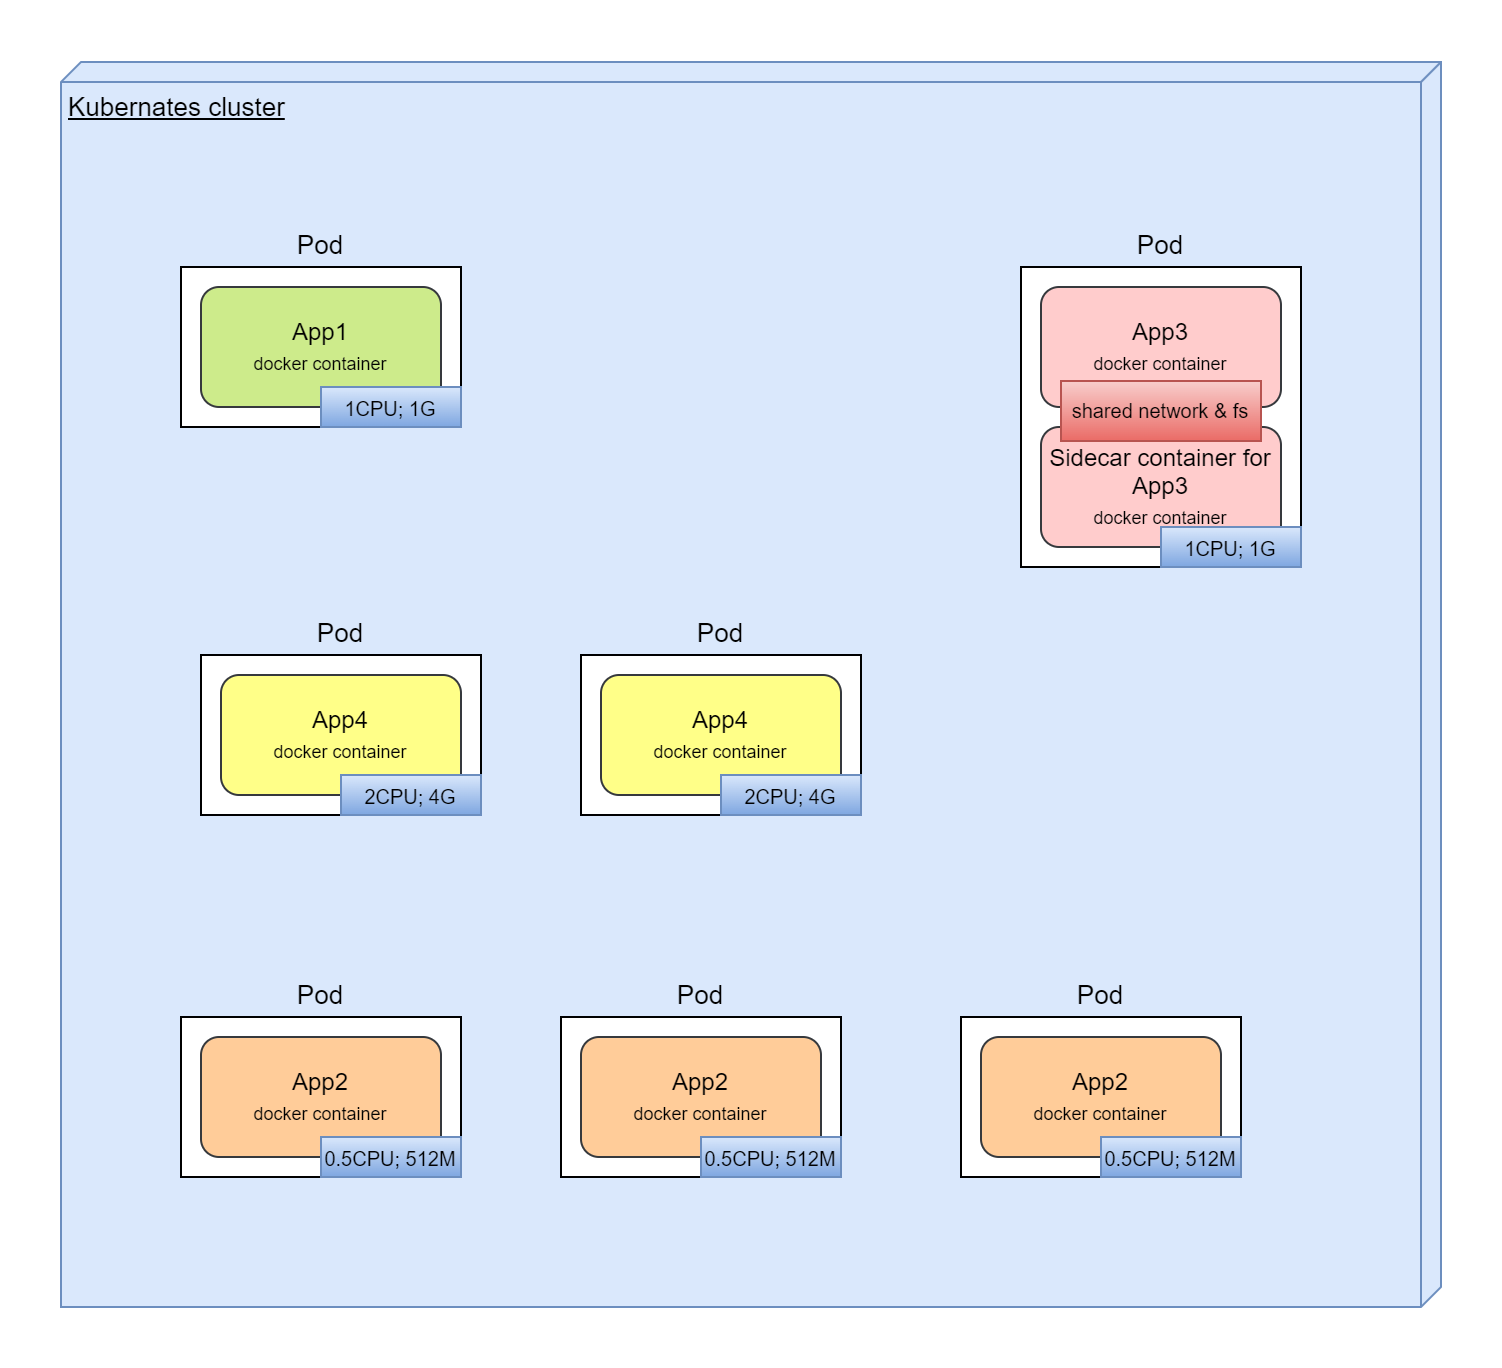
we have here:
- Automated process for deployments, rollbacks
- Automated resource management. We just declare how many resources we want to have for service
- Service discovery
- Automated scaling
It is very simple to think about all resources as about one compute space with no boundaries between servers. Kubernetes takes over all the work behind this abstraction.
High-level Kubernetes architecture

We combine all our computing nodes and call them Worker-node. Kubernetes will run docker containers on the Worker-nodes. To organize cluster we should create one node which has name Master-node and hosts Kubernetes services which organize cluster and provide all Kubernetes features.
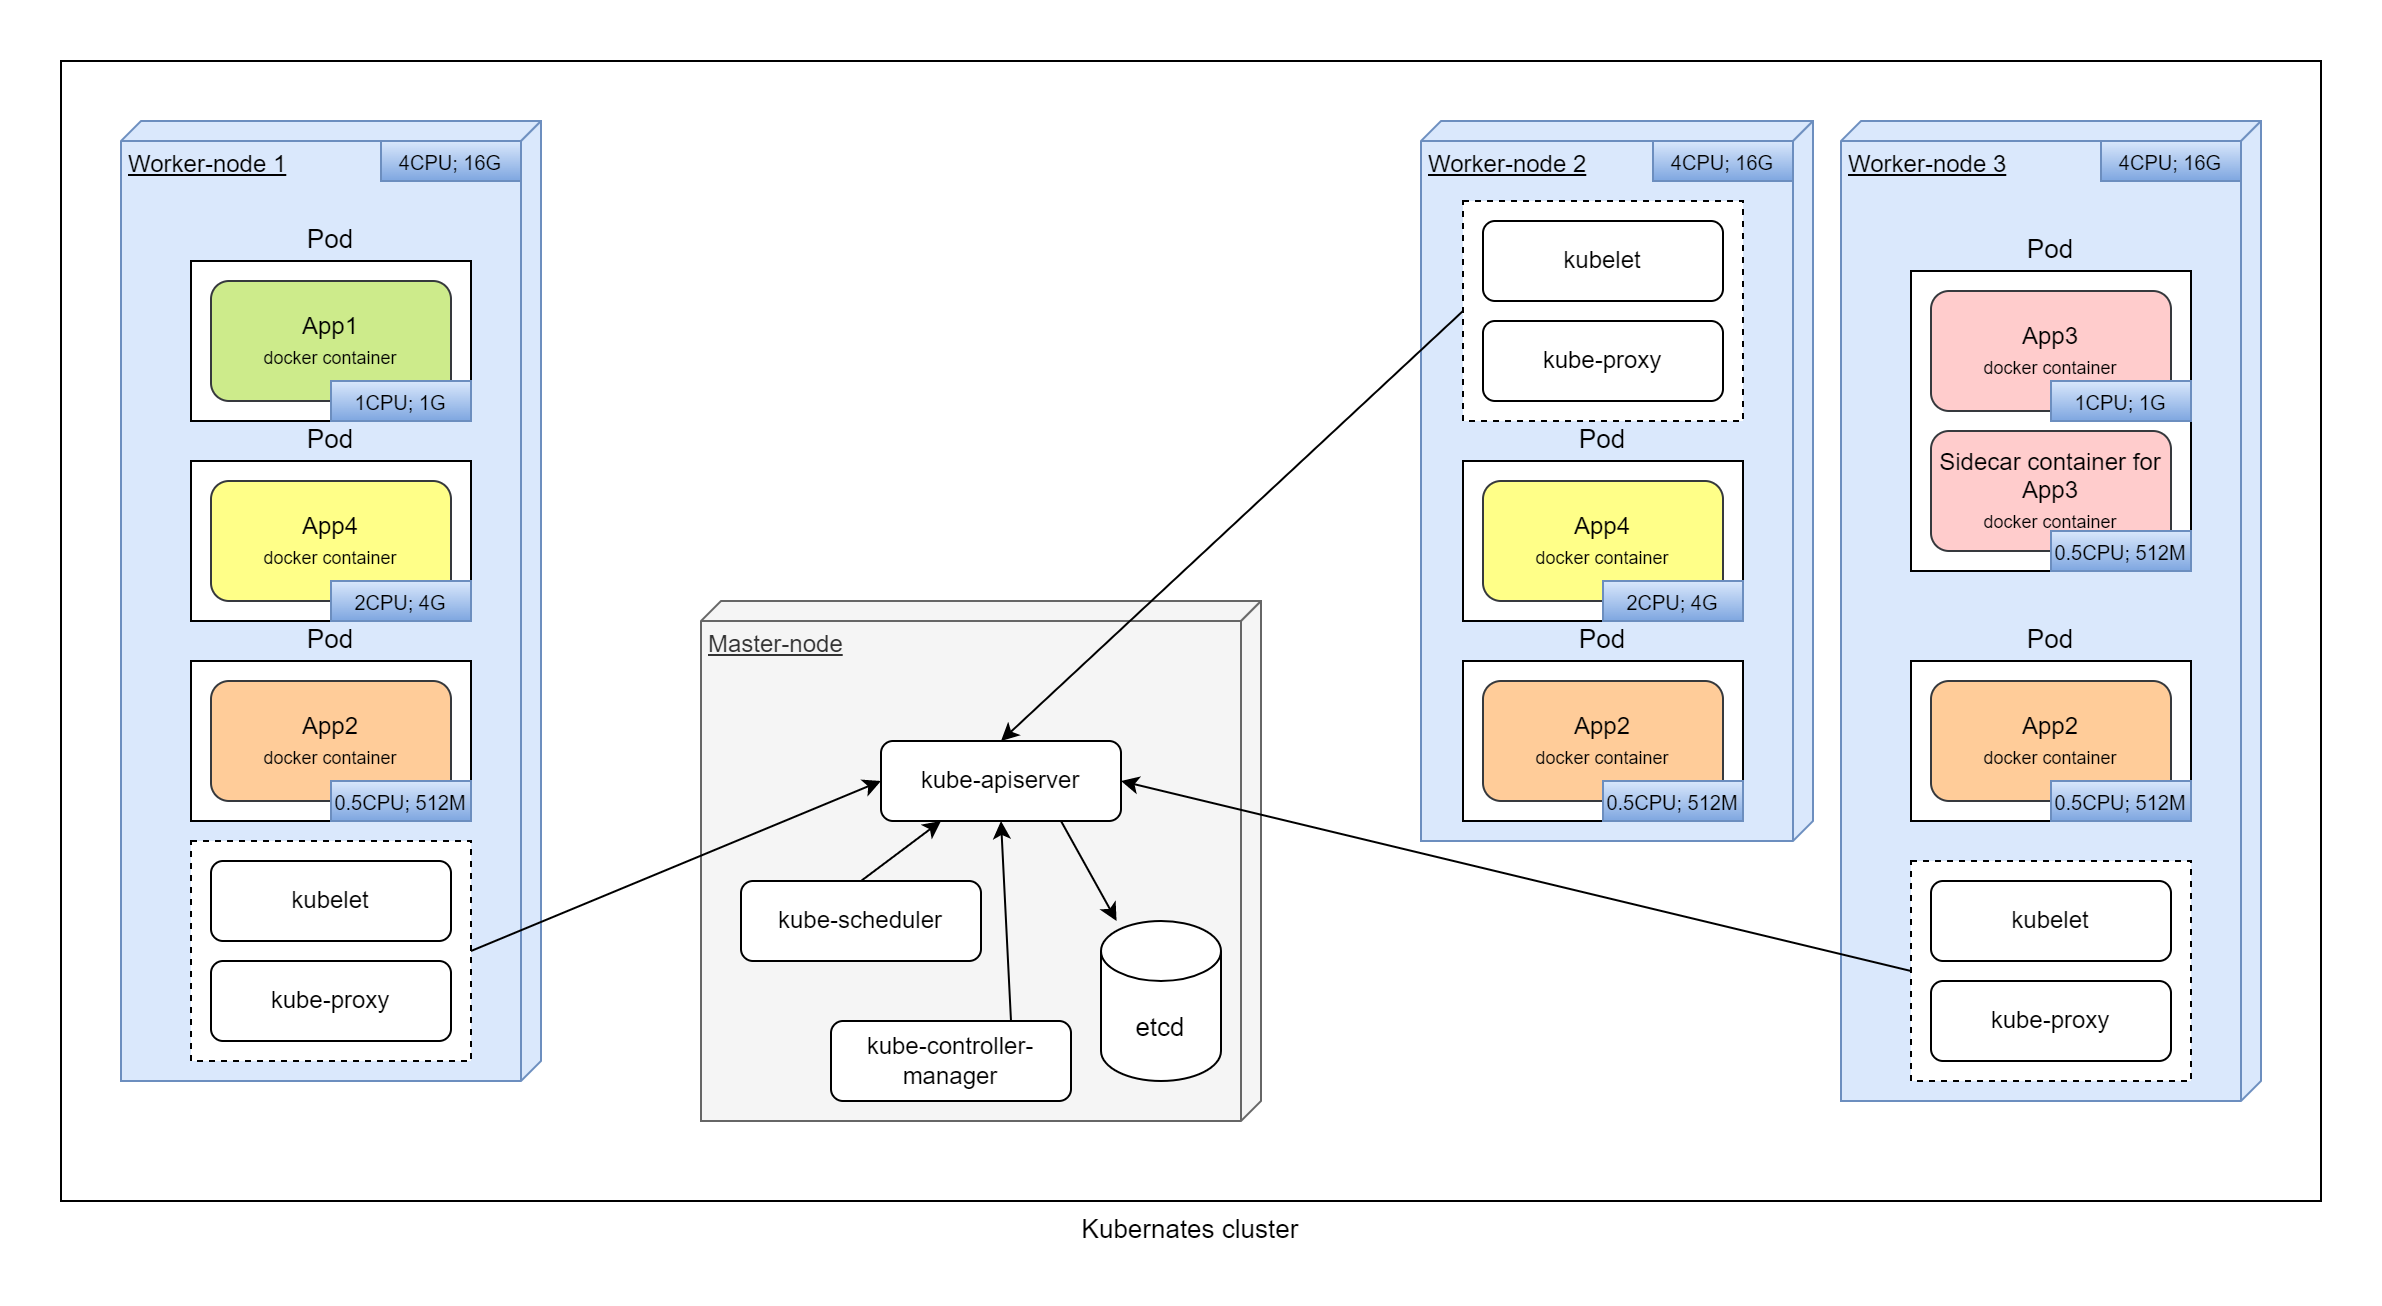
White boxes are system components.
In this detailed diagram, in general terms, we can see which services are located on which nodes and how they interact with each other.
- Master-node - Main node which manage all cluster. To increase fault tolerance, there are several master nodes.
- kube-apiserver - Cluster API. All Kubernetes services in cluster are working through this API, not directly.
- kube-scheduler - plans which pods in which nodes will be launched.
- etcd - all cluster configuration and state are stored in this database.
- kube-controller-manager - core control functionality.
- Worker-node - Nodes on which containers are running.
- kube-proxy - organize connectivity, network access to and from containers.
- kubelet - Kubernetes service that starts, stops, manage containers on nodes.
Kubernetes objects
The most important abstractions in this list: Pod, Service, Deployment, Ingress.
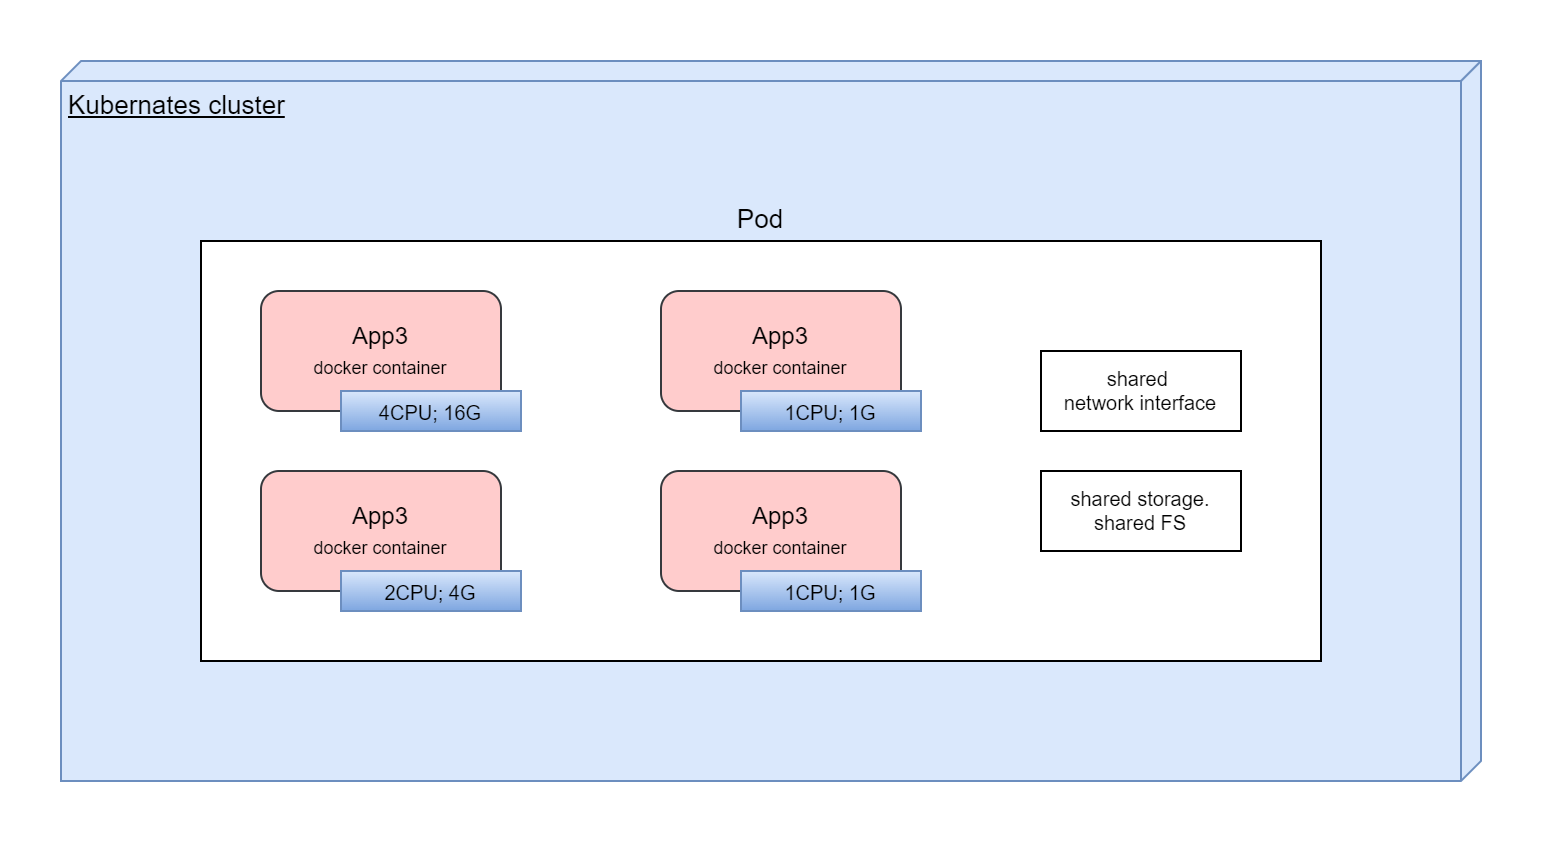
Pod
Main Kubernetes abstraction. Pod encapsulates one or more containers. All containers in Pod has shared storage, network interface, configuration. Kubernetes is working with Pods, not with containers directly.
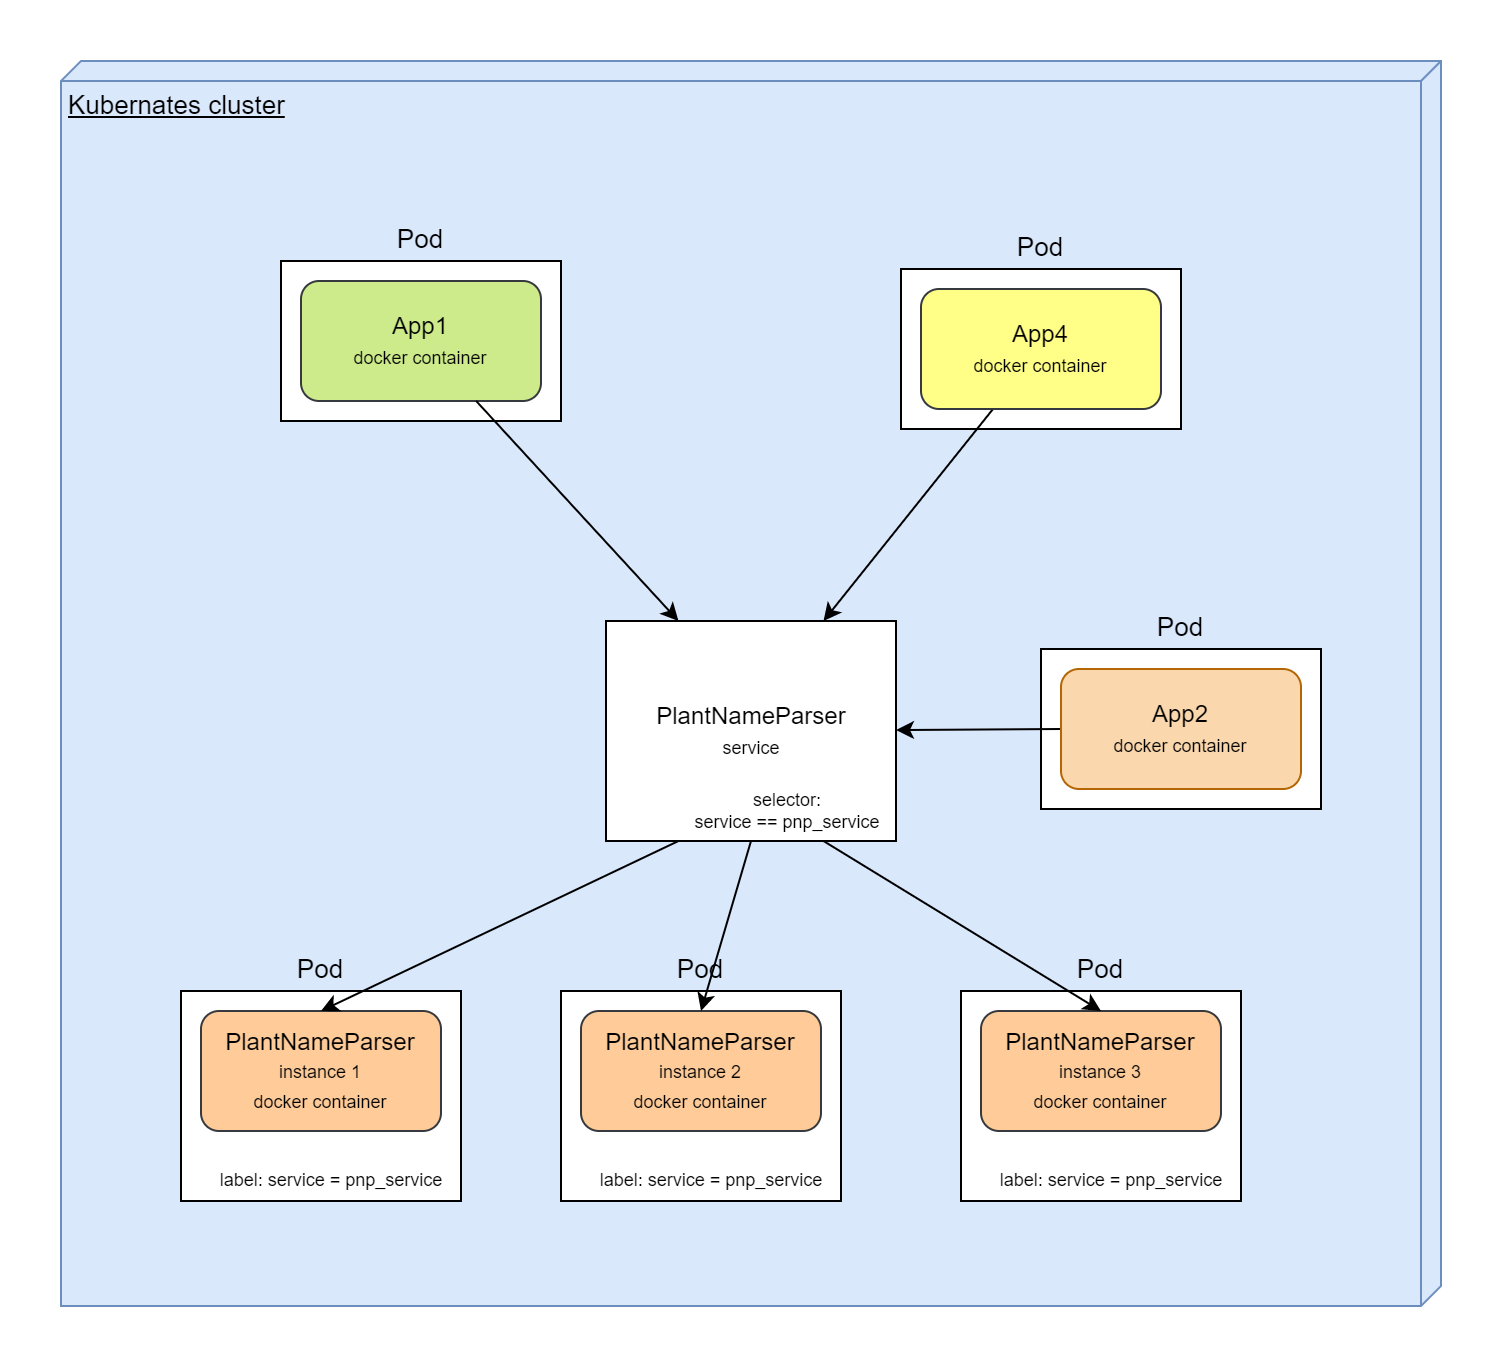
Service
Logical union for set of Pods. Service as a loadbalancer, and determines which Pod should handle incoming request. Service as a router, routs requests to Pods. Service as a service discovery tool, knows all about Pods lifecycle, their location, etc...
Service does not create, delete, or recreate Pods. Service just find Pods and organize access.
Service knows which Pods they should handle using the label based selector.
Other application or services in same application can make requests to Pods behind service by service name.
Service Types - different service types provide ability to expose a Service onto an external IP.
- ClusterIP - Default. Exposes the Service on a cluster-internal IP.
- NodePort - Exposes the Service on each Node's IP at a static port.
- LoadBalancer - Exposes the Service externally using an external load balancer. On cloud providers which support external load balancers, setting the type field to LoadBalancer provisions a load balancer for your Service. Traffic from the external load balancer is directed at the backend Pods. The cloud provider decides how it is load balanced. Enhanced version of NodePort.
- ExternalName - Maps the Service to the contents of the externalName field. No proxying of any kind is set up. This service type can provide access to external resources, services to pods inside K8s cluster. ExternalName works in dns level and delivers external address as CNAME for its own service domain name. ExternalName can cause problems with http and https, as the headers will contain the wrong domain name.
Volumes
On top of various storage mechanisms, Volume provides access to storages for containers in Pods.
By default, all changes in container will be lost when container is terminated.
Types of volumes:
- emptyDir - Exists as long as that Pod is running on that node. All containers in the Pod can read and write the same files in the emptyDir volume
apiVersion: v1
kind: Pod
metadata:
  name: plant-name-parser
spec:
  containers:
  - image: aganyushkin/plant-name-parser-service:1.0.1
    name: name-parser
    volumeMounts:
    - mountPath: /cache
      name: cache-volume
  volumes:
  - name: cache-volume
    emptyDir:
      sizeLimit: 500Mi
- hostPath - A hostPath volume mounts a file or directory from the host node's filesystem into your Pod. Not deleted when the pod is deleted.
apiVersion: v1
kind: Pod
metadata:
  name: plant-name-parser
spec:
  containers:
  - image: aganyushkin/plant-name-parser-service:1.0.1
    name: name-parser
    volumeMounts:
      - mountPath: /host-data
        name: data-volume
  volumes:
    - name: data-volume
      hostPath:
        path: /data  # host directory
        type: Directory
-
nfs - Allows an existing NFS (Network File System) share to be mounted into a Pod. Not deleted when the pod is deleted.
-
iscsi - volume allows an existing iSCSI (SCSI over IP) volume to be mounted into your Pod.
And more types in documentation...
PersistentVolume, PersistentVolumeClaim and StorageClass
For stateful applications that need to store data. An abstraction is used to hide details of storage mechanisms. Makes the application more portable.
- PersistentVolume - storage resource description, in cluster level. Should be configured by Admins and requested from application with PersistentVolumeClaim.
Types of Persistent Volumes, Access Modes, Reclaim Policy
-
PersistentVolumeClaim - used in application configuration and points to PersistentVolume which should be used as volume. It is your claim to use volume. All settings in PersistentVolumeClaim and in PersistentVolume must be identical. In
volumessection in Pod template we will use claim name and this will attach volume to Pod. -
StorageClass - Instead of manual creation, StorageClass can automatically create PersistentVolume for requested PersistentVolumeClaim.
Namespaces
Mechanism in Kubernetes to organize virtual clusters in one physical cluster. Also, with namespaces we can organize environments: dev,qa,prod, etc...
Controller. ReplicaSet, StatefulSet, Deployment, Job, etc...
Common name for management instruments in cluster to configure and support cluster in desired state.
-
ReplicaSet - Deploys and supports in running state the specified number of Pods. Tracks replicated Pods and supports replicated Pods in the specified configuration.
-
StatefulSet - Same as ReplicaSet, but for stateful applications. Can provide permanent storage.
-
DaemonSet - The process (Pod) which works in background. One Pod will be deployed in each Worker-node in cluster.
-
Deployment - In Deployment we can define what state of our application we want to have. Kubernetes will create or update described configuration for us. Uses ReplicaSet to create described pods. Supports rollout / rollback.
-
Job - Creates one or more Pods and tracks the successful completions. Useful for background tasks and batch processing.
-
CronJob - Cron in Kubernetes. Performing regular scheduled tasks.
sidecar containers
Kubernetes allows to have more than one container in its minimum logical unit (Pod). There will be a bad practice to put all application containers in one Pod. But in some cases it's very useful. For example, we can add separate container in Pod with tool to gather logs, due to in Pod we shared filesystem. This approach with main container and additional containers is called "sidecar containers".
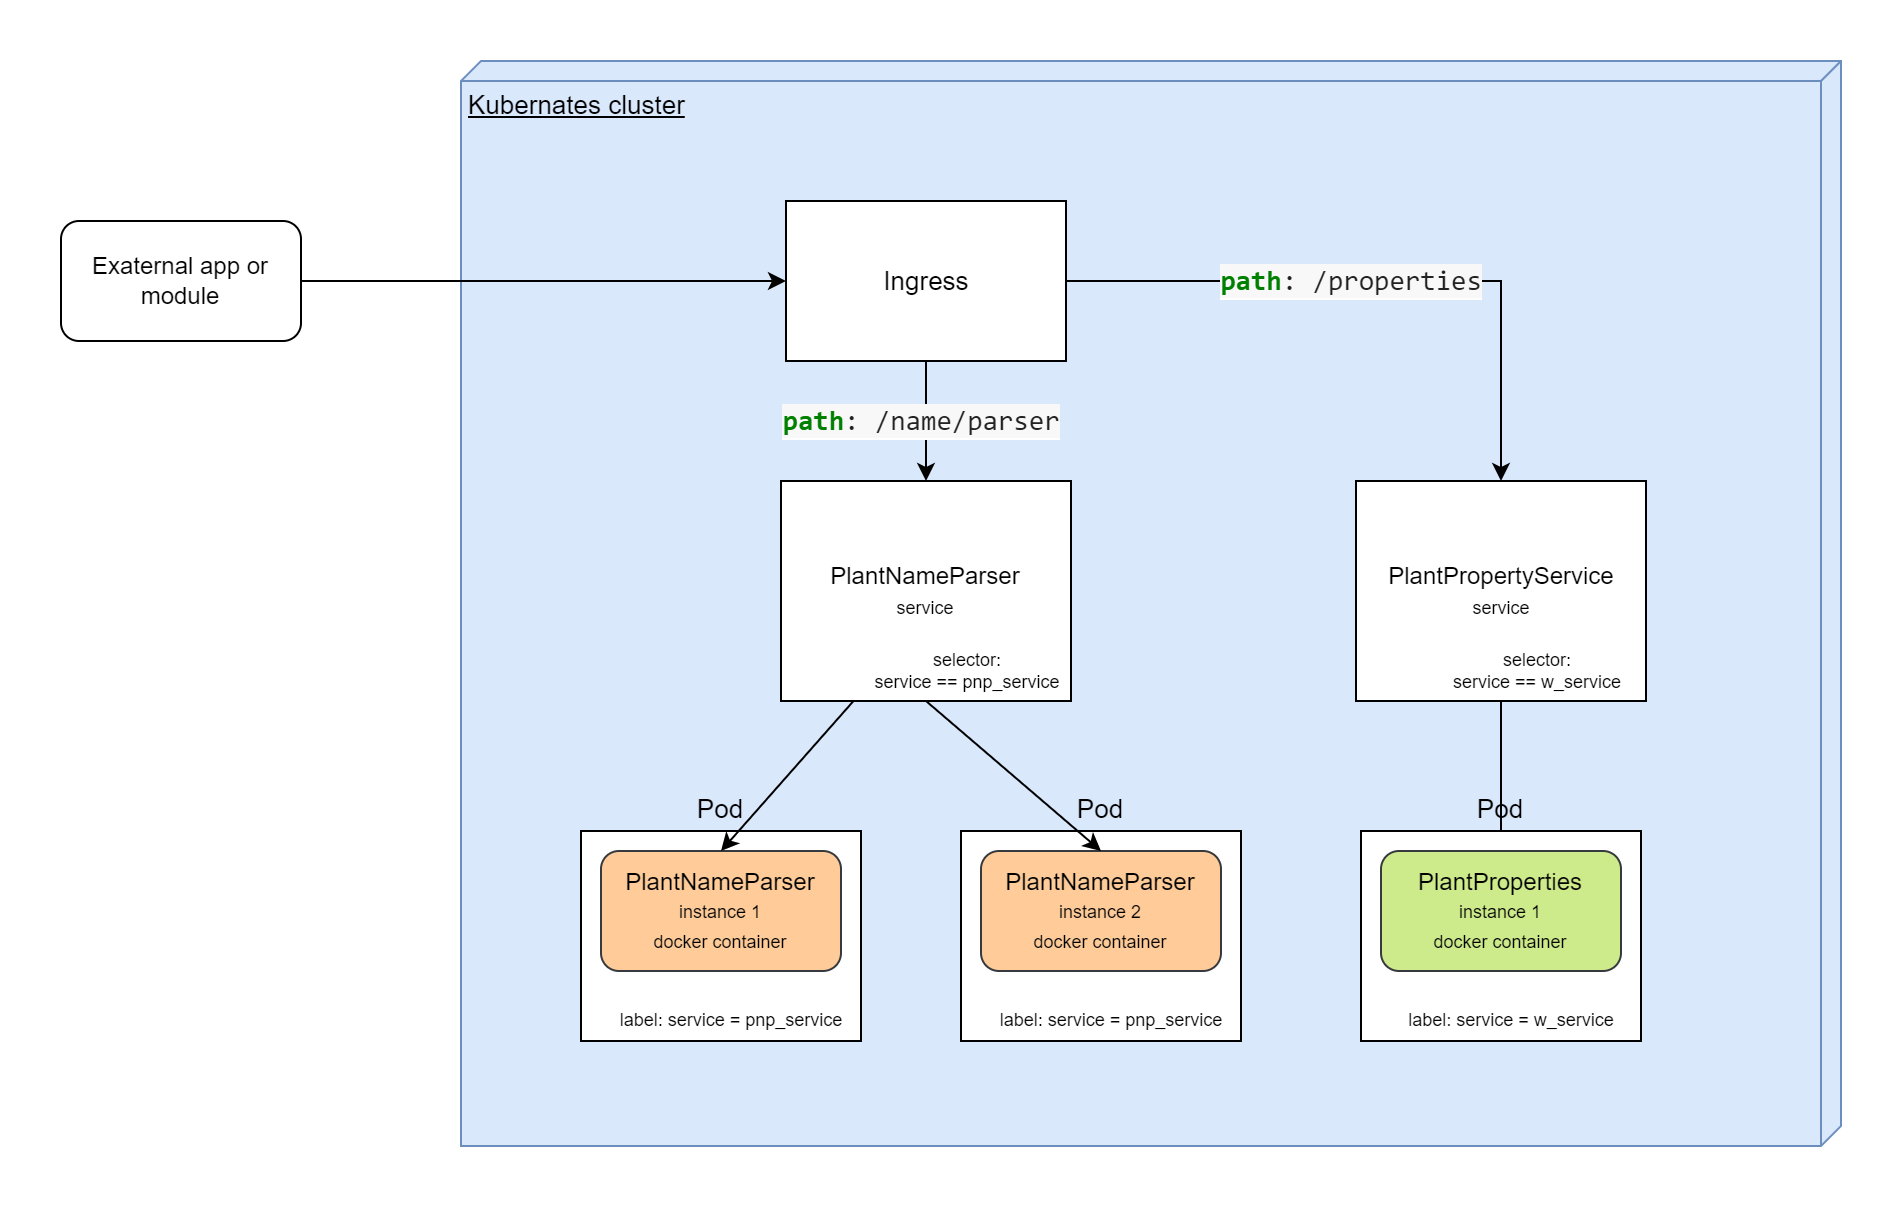
Ingress and Ingress Controller
Ingress exposes HTTP and HTTPS routes from outside the cluster to services within the cluster. Traffic routing is controlled by rules defined on the Ingress resource.
Features:
- Name-based virtual hosts support routing HTTP traffic to multiple host names at the same IP address.
- Configuration routes traffic from a single IP address to more than one Service
- TLS support
Ingress Controller - It is a service which realize Ingress configuration.
Ingress in Kubernetes can be realized with:
- Nginx Ingress Controller
- Traefik
- HAproxy
Ingress Controller must be installed in cluster to have ability to use Ingress objects.
On Windows (with Docker Desktop) Ingress Controller con be installed with instruction: Installation Guide.
## For Docker Desktop,
helm upgrade --install ingress-nginx ingress-nginx \
  --repo https://kubernetes.github.io/ingress-nginx \
  --namespace ingress-nginx --create-namespace

## check installation
kubectl get pods --namespace=ingress-nginx

## forward a local port to the ingress controller
kubectl port-forward --namespace=ingress-nginx service/ingress-nginx-controller 1313:80

## find local port for ingress controller service
kubectl get service ingress-nginx-controller --namespace=ingress-nginx
If everything is fine, then you can create Ingress objects.
ConfigMaps
A ConfigMap is an API object used to store non-confidential data in key-value pairs. Pods can consume ConfigMaps as environment variables, command-line arguments, or as configuration files in a volume.
ConfigMap is not for secrets in you application. Use Kubernetes Secrets for secrets.
apiVersion: v1
kind: ConfigMap
metadata:
  name: global-storage-configuration
data:
  storage_url: "bla-bla-bla"
  file.properties: |
    option1=value1
    option2=value2
Usage all entries from ConfigMap in Pod
## spec.template.spec.containers[*]
  envFrom:
  - configMapRef:
      name: global-storage-configuration
Use only specific key from ConfigMap
## spec.template.spec.containers[*]
  env:
  - name: STORAGE_ADDRESS
    valueFrom:
      configMapKeyRef:
        name: global-storage-configuration
        key: storage_url
Create file with name "/config/app-cfd.properties" from ConfigMap property "file.properties"
### for Pod configuration
## spec.
  volumes:
    - name: config
      configMap:
        name: global-storage-configuration
        items: # if this section is absent, all fields will be added
          - key: "file.properties"
            path: "app-cfd.properties"   # or with ConfigMap property key name if 'path' is absent here

## spec.containers[*]
      volumeMounts:
        - name: config
          mountPath: "/config"
          readOnly: true
When ConfigMap was changes, all pods which are used this ConfigMap should be restarted.
Labels and Selectors
Labels are key/value pairs that are attached to objects such as Pods. Labels can be used to organize and to select subsets of objects.
In metadata section we can define labels for Kubernetes objects
apiVersion: v1
kind: Pod
metadata:
  name: demo-service
  labels:
    environment: qa
    wrapped: MinIO
    component: plant-name-parser
spec:
  ...
Labels is not unique, and you can attach label environment: qa for all objects (pods for example)
which was created for QA environment.
With label selector we can identify a set of objects.
The API currently supports two types of selectors: equality-based and set-based. A label selector can be made of multiple requirements which are comma-separated. In the case of multiple requirements, all must be satisfied so the comma separator acts as a logical AND (&&) operator.
equality-based: "=", "!="
set-based: "in", "notin" and "exists" for key identifier
comma-separated means logic AND: "environment=qa,wrapped=MinIO" - means: environment=qa AND wrapped=MinIO
Select all object with label "environment" and value "qa":
environment=qa
Or select non-production objects:
environment!=qa
Or select Kubernetes node which provides GPU:
gpu=nvidia
Check if gpu label assigned to object:
gpu
Well-Known Labels, Annotations and Taints
Label selector with matchExpressions
- matchExpressions - is a list of pod selector requirements:
selector:
  matchExpressions:
    - key: component
      operator: In
      values:
        - plant-name-parser
    - key: gpu
      operator: Exists
Supported operations: In, NotIn, Exists, and DoesNotExist.
AND logic is applied between all entries in matchExpressions.
- matchLabels - is equivalent to an element of matchExpressions, whose key field is "key", the operator is "In", and the values array contains only "value":
selector:
  matchLabels:
    component: plant-name-parser
Labels in YAML configuration
Labels can be assigned to any type of objects in Kubernetes.
- node selector for pod configuration:
apiVersion: v1
kind: Pod
metadata:
  labels:
    component: ml-plant-image-classifier
spec:
  nodeSelector:
    gpu: nvidia
  ...
- service object in Kubernetes to specify which pods are linked with Service:
apiVersion: v1
kind: Service
metadata:
  labels:
    component: plant-name-parser-service
spec:
  selector:
    component: plant-name-parser
  ...
Labels with kubectl
List all pods in QA environment:
kubectl get pods -l "environment=qa"
List all MinIO in non-prod environments:
kubectl get pods -l "environment!=qa,wrapped=MinIO"

## or with set of environments:
kubectl get pods -l "environment in (dev, qa, sit, perf),wrapped=MinIO"

## or with notin
kubectl get pods -l "environment notin (prod),wrapped=MinIO"
Annotations
With annotations, we can attach arbitrary non-identifying metadata to objects. Very similar to labels, but can't be used with selector. There is no annotation selectors in Kubernetes.
For example, we can assign additional metadata to pod:
apiVersion: v1
kind: Pod
metadata:
  labels:
    component: ml-plant-image-classifier
  annotations:
    developerBy: "ML Team"
spec:
  nodeSelector:
    gpu: nvidia
Container runtime
The container runtime is the software that is responsible for running containers.
Kubernetes supports container runtimes such as containerd, CRI-O, and any other implementation of the Kubernetes CRI (Container Runtime Interface).
It means Docker is not the only one runtime in Kubernetes.
Probes: livenessProbe, readinessProbe and startupProbe
- livenessProbe - The kubelet uses liveness probes to know when to restart a container.
- startupProbe - Used if we need to wait for the application to launch. Waiting before executing a liveness probe. If check will return OK, then processing completes and starts working livenessProbe and container moved to running status.
- readinessProbe - uses to know is container ready to accept traffic or not.
Liveness probes do not wait for readiness probes to succeed. If you want to wait before executing a liveness probe you should use initialDelaySeconds or a startupProbe.
- Exec probes - execute command in container. OK if return code == 0.
## spec.containers[*].
    startupProbe:
      exec:
        command:
        - cat
        - /tmp/healthy
      initialDelaySeconds: 5
      periodSeconds: 5
- TCP probes - trying to open port. OK if connection was established.
## spec.containers[*].
    readinessProbe:
      tcpSocket:
        port: 8080
      initialDelaySeconds: 5
      periodSeconds: 10
- HTTP probes - send httpGet request. OK if status-code == 200.
## spec.containers[*].
    livenessProbe:
      httpGet:
        path: /healthz
        port: 8080
        httpHeaders:
        - name: Custom-Header
          value: Awesome
      initialDelaySeconds: 3
      periodSeconds: 3
Probes initiated by kubelet agent.
Parameters:
- initialDelaySeconds - Number of seconds after the container has started before startup, liveness or readiness probes are initiated. Defaults to 0 seconds. Minimum value is 0.
- periodSeconds - How often (in seconds) to perform the probe. Default to 10 seconds. The minimum value is 1.
- timeoutSeconds - Number of seconds after which the probe times out. Defaults to 1 second. Minimum value is 1.
- successThreshold - Minimum consecutive successes for the probe to be considered successful after having failed. Defaults to 1. Must be 1 for liveness and startup Probes. Minimum value is 1.
- failureThreshold - After a probe fails failureThreshold times in a row, Kubernetes considers that the overall check has failed
- terminationGracePeriodSeconds - configure a grace period for the kubelet to wait between triggering a shut down of the failed container
Working with the Kubernetes cluster
Command Line Interface
Namespaces
## Create new namespace
kubectl create namespace dev-env

## List namespaces
kubectl get namespace

## Set default namespace
kubectl config set-context --current --namespace=dev-env

## Get current NS
kubectl config view --minify -o jsonpath='{..namespace}'

## Access to separate namespace. Use '--namespace' option in any commands.
kubectl get pods --namespace qa-env

## Delete NS
kubectl delete ns dev-env
Pods
## List pods, deployments, etc...
kubectl get pods
## or with "-o wide" option for more details
kubectl get pods -o wide

## get list from all namespaces
kubectl get pods --all-namespaces

## Get description for exact pod, etc...
kubectl describe pods plant-name-parser-service

## Get full YAML pod configuration from Kubernetes
kubectl get pod plant-name-parser-service -o yaml
Deploy and delete pod:
## Start new Pod from CLI
kubectl run plant-name-parser-service --port=8080 \
  --image=plant-name-parser-service:v1.0.1

## Remove Pod
kubectl delete pod plant-name-parser-service
Get access to Pod shell
## access the shell
kubectl exec plant-name-parser-service -it /bin/bash

## If you have more then one container in pod you should specify container name:
kubectl exec plant-name-parser-service --container <container-name> -it /bin/bash
If you have access to the shell in Kubernetes pod instance, you can use
envcommand and list all environment variables. Kubernetes inject number of environment variables with ip and port settings for service discovery. Example, service address will be injected in as MYSERVICE_SERVICE_HOST, MYSERVICE_SERVICE_PORT.Other approach to list environment variables in pod:
kubectl exec plant-name-parser -- printenv
Port forwarding
## Port forwarding. Forwarding from localhost:9090 -to-> plant-name-parser-service:8080
kubectl port-forward plant-name-parser-service 9090:8080
Binds the resource port to the local port and makes it possible to make a request to the resource. Can forward a port from a remote cluster.
Pod logs
## Show logs.
## '-f' - Specify if the logs should be streamed.
kubectl logs -f plant-name-parser-service

## Show only 100 last(tail) log entries for container plant-name-parser-service
##   in pod plant-name-parser-service.
kubectl logs plant-name-parser-service -c plant-name-parser-service --tail=13
Deploy and delete resources with YAML
## Deploying resources on a cluster using YAML manifest files.
kubectl apply -f plant-name-parser-service.pod.yaml

## Delete
kubectl delete -f plant-name-parser-service.pod.yaml
YAML configuration
Some examples are in demo repository: github.com/AGanyushkin/demo-k8s
Pod
YAML Pod configuration for plant-name-parser-service:
apiVersion: v1
kind: Pod
metadata:
  name: plant-name-parser
  labels:
    environment: dev
    component: plant-name-parser
  annotations:
    developer: Andrey G.
spec:
  containers:
    - name: plant-name-parser
      image: aganyushkin/plant-name-parser-service:1.0.1
      ports:
        - containerPort: 8080
      resources:
        limits:
          cpu: "1"
          memory: "200Mi"
        requests:
          cpu: "0.5"
          memory: "100Mi"
      env:
        - name: SPRING_PROFILES_ACTIVE
          value: "k8s"
        - name: JAVA_OPTS
          value: "-Xms200M -Xmx200M -server"
In this configuration we have 'resources' description for our pod with 'limits' and 'requests' sections:
- requests - kube-scheduler uses this information to decide which node to place the Pod on.
- limits - kubelet enforces those limits so that the running container is not allowed to use more of that resource than the limit you set.
If the node where a Pod is running has enough of a resource available, it's possible (and allowed) for a container to use more resource than its request for that resource specifies. However, a container is not allowed to use more than its resource limit.
Resource Management for Pods and Containers
Let's deploy and manage pod with commands below:
## Deploy and start
kubectl apply -f ./case1/plant-name-parser.pod.yaml

## Get last logs entry
kubectl logs plant-name-parser --tail=1

## List all pods with environment==dev
## and show fields environment and component in output table
kubectl get pods -l "environment in (dev)" -L "environment,component"

## get access to the pod
kubectl port-forward plant-name-parser 8080:8080
## and check with request:
##POST http://localhost:8080/api/v1/parse
##Content-Type: application/json
##
##{
##  "text": "betula pendula"
##}

## Remove
kubectl delete -f ./case1/plant-name-parser.pod.yaml
Init Containers
A Pod can have multiple containers running apps within it, but it can also have one or more init containers, which are run before the app containers are started.
Init containers always run to completion. Each init container must complete successfully before the next one starts. If you specify multiple init containers for a Pod, kubelet runs each init container sequentially.
apiVersion: v1
kind: Pod
metadata:
  name: plant-name-parser
  labels:
    environment: dev
    component: plant-name-parser
  annotations:
    developer: Andrey G.
spec:
  initContainers:
    - name: init-parser
      image: aganyushkin/plant-name-parser-service:1.0.1
      command: ['initialize-parser.sh', '--type', 'V3.2']
  containers:
    - name: plant-name-parser
      image: aganyushkin/plant-name-parser-service:1.0.1
      ...
ReplicaSet
With ReplicaSet we can scale the previous example:
apiVersion: apps/v1
kind: ReplicaSet
metadata:
  name: plant-name-parser-rs
  labels:
    environment: dev
    component: plant-name-parser-rs
spec:
  replicas: 3
  selector:
    matchLabels:
      environment: dev
      component: plant-name-parser
  template:
    metadata:
      labels:
        environment: dev
        component: plant-name-parser
      annotations:
        developer: Andrey G.
    spec:
      containers:
        - name: plant-name-parser
          image: aganyushkin/plant-name-parser-service:1.0.1
          ports:
            - containerPort: 8080
          resources:
            limits:
              cpu: "1"
              memory: "1Gi"
            requests:
              cpu: "1"
              memory: "1Gi"
          env:
            - name: SPRING_PROFILES_ACTIVE
              value: "k8s"
            - name: JAVA_OPTS
              value: "-Xms1G -Xmx1G -server"
and deploy with:
kubectl apply -f ./case1/plant-name-parser.rs.yaml
In this example:
- ReplicaSet object will manage 3 pods with our service "plant-name-parser-service"
- 'template' are specification for ReplicaSet, how pods looks like.
- Labels it is relationship between ReplicaSet and Pods:
## define labels in pod template
...
template:
  metadata:
    labels:
      environment: dev
      component: plant-name-parser
...

## create label selector in replicaset
...
spec:
  replicas: 3
  selector:
    matchLabels:
      environment: dev
      component: plant-name-parser
...
We can scale ReplicaSet and increase or decrease number of pods. To do this, just change replicas: 3
and apply with kubectl apply -f ./case1/plant-name-parser.rs.yaml.
Deployment
apiVersion: apps/v1
kind: Deployment
metadata:
  name: plant-name-parser-d
  labels:
    environment: dev
    component: plant-name-parser-d
spec:
  replicas: 3
  strategy:
    rollingUpdate:
      maxSurge: 1
      maxUnavailable: 1
    type: RollingUpdate
  selector:
    matchLabels:
      environment: dev
      component: plant-name-parser
  template:
    metadata:
      labels:
        environment: dev
        component: plant-name-parser
      annotations:
        developer: Andrey G.
    spec:
      containers:
        - name: plant-name-parser
          image: aganyushkin/plant-name-parser-service:1.0.1
          ports:
            - containerPort: 8080
          resources:
            limits:
              cpu: "1"
              memory: "1Gi"
            requests:
              cpu: "1"
              memory: "1Gi"
          env:
            - name: SPRING_PROFILES_ACTIVE
              value: "k8s"
            - name: JAVA_OPTS
              value: "-Xms1G -Xmx1G -server"
The main differences between ReplicaSet and Deployment:
  strategy:
    rollingUpdate:
      maxSurge: 1
      maxUnavailable: 1
    type: RollingUpdate
In Deployment we can configure how this object will update our application with new version or other changes.
Deployment strategy:
- Recreate - remove all old pods and when create new pods.
- RollingUpdate - (default) is it rolling update with options:
- maxSurge - specifies the maximum number of Pods that can be created over the desired number of Pods
- maxUnavailable - how many pods can be unavailable in same time during release
Kubernetes doesn't count terminating Pods when calculating the number of availableReplicas, which must be between replicas - maxUnavailable and replicas + maxSurge. As a result, you might notice that there are more Pods than expected during a rollout, and that the total resources consumed by the Deployment is more than replicas + maxSurge until the terminationGracePeriodSeconds of the terminating Pods expires.
A lot of details for Deployment object.
rollback to previous deployment
## List of version:
kubectl rollout history deployment plant-name-parser-d

## Rollback to previous version
kubectl.exe rollout undo deployment plant-name-parser-d

## Or rollback to specific revision
kubectl.exe rollout undo deployment plant-name-parser-d --to-revision=3
Service
To be able to make requests to Pods from external network, we can use Service Kubernetes object. Let's create Service for plant-name-parser-service:
apiVersion: v1
kind: Service
metadata:
  name: plant-name-parser-service
  labels:
    environment: dev
    component: plant-name-parser-srv
spec:
  selector:
    environment: dev
    component: plant-name-parser
  ports:
    - protocol: TCP
      port: 5080
      targetPort: 8080
  type: LoadBalancer
This service organize access for pods with environment == dev AND component == plant-name-parser.
On Windows with Docker Desktop we can use type: LoadBalancer and service will be available on localhost:5080.
Deploy and try the service:
kubectl apply -f ./case1/plant-name-parser.service.yaml

## Chekc created service
kubectl get service

## Output
##NAME                        TYPE           CLUSTER-IP     EXTERNAL-IP   PORT(S)          AGE
##plant-name-parser-service   LoadBalancer   10.102.54.75   localhost     5080:31216/TCP   7s

## and check with request:
##POST http://localhost:5080/api/v1/parse
##Content-Type: application/json
##
##{
##  "text": "betula pendula"
##}
discovery with environment variables
After the service is created, the following list of variables will be injected into all new pods.
PLANT_NAME_PARSER_SERVICE_PORT_5080_TCP_PROTO=tcp
PLANT_NAME_PARSER_SERVICE_PORT_5080_TCP_PORT=5080
PLANT_NAME_PARSER_SERVICE_PORT_5080_TCP_ADDR=10.102.54.75
PLANT_NAME_PARSER_SERVICE_SERVICE_HOST=10.102.54.75
PLANT_NAME_PARSER_SERVICE_SERVICE_PORT=5080
These variables make service discovery easier for us, we can use it to connect services to each other.
Note: Services must be created before pods.
discovery with dns
In addition, we can use dns discovery to send a request to the service:
## with full domain name
curl http://plant-name-parser-service.default.svc.cluster.local:5080/

## for services in one namespace
curl http://plant-name-parser-service:5080/

## for services in different namespaces
curl http://plant-name-parser-service.dev-ns:5080/
Just build domain name with pattern: <service-name>.<namespace-name>.svc.cluster.local.
session stickiness
If you want to make sure that connections from a particular client are passed to the same Pod each time, you can configure session affinity based on the client's IP address. Read session affinity to learn more.
apiVersion: v1
kind: Service
spec:
  sessionAffinity: ClientIP
...
Ingress
With Ingress we can create mapping for Ingress Controller to provide access for service through a shared access point for Kubernetes cluster.
Required: configured Ingress Controller.
apiVersion: networking.k8s.io/v1
kind: Ingress
metadata:
  name: seed-ing
spec:
  ingressClassName: nginx
  rules:
    - http:
        paths:
          - path: /api/v1/parse
            pathType: Exact
            backend:
              service:
                name: plant-name-parser-service
                port:
                  number: 5080
Here, we configured mapping for requests to /api/v1/parse in any domains.
These requests will be proxied to the service plant-name-parser-service:5080.
## Deploy ingress configuration
kubectl.exe apply -f ./case1/ingress.yaml

## check created ingress
kubectl get ingress
## Output
##NAME       CLASS   HOSTS   ADDRESS     PORTS   AGE
##seed-ing   nginx   *       localhost   80      177m
If Ingress created, then it is possible to check this service with request:
POST http://localhost/api/v1/parse
Content-Type: application/json

{
  "text": "betula pendula"
}
In this request I used localhost:80 because my IngressController is configured on this port
and Iam trying to send this request to Ingress:
## Check Ingress Controller configuration
## Check, which local port is used by Ingress Controller. (localhost:80)
kubectl get service ingress-nginx-controller --namespace=ingress-nginx
## Output
##NAME                       TYPE           CLUSTER-IP       EXTERNAL-IP   PORT(S)                      AGE
##ingress-nginx-controller   LoadBalancer   10.106.131.181   localhost     80:30128/TCP,443:30183/TCP   3h25m
PersistentVolume and PersistentVolumeClaim
First, we need to define PersistentVolume:
apiVersion: v1
kind: PersistentVolume
metadata:
  name: binary-storage
spec:
  capacity:
    storage: 8Gi
  volumeMode: Filesystem
  accessModes:
    - ReadWriteOnce
  persistentVolumeReclaimPolicy: Retain
  storageClassName: ""
  hostPath:
    path: /data/binary-storage-files
    type: DirectoryOrCreate
Second, in the application we create a PersistentVolumeClaim:
apiVersion: v1
kind: PersistentVolumeClaim
metadata:
  name: parser-storage-claim
spec:
  accessModes:
    - ReadWriteOnce
  volumeMode: Filesystem
  resources:
    requests:
      storage: 8Gi
  storageClassName: ""
volumeMode:
- Filesystem - mounted into Pods into a directory
- Block - raw block device without any filesystem
Third, use PersistentVolumeClaim in pod configuration:
apiVersion: v1
kind: Pod
metadata:
  name: plant-name-parser
spec:
  containers:
    - image: aganyushkin/plant-name-parser-service:1.0.1
      name: name-parser
      volumeMounts:
        - mountPath: /cache
          name: cache-volume
  volumes:
    - name: cache-volume
      persistentVolumeClaim:
        claimName: parser-storage-claim
Stateful in Kubernetes cluster
In general, it is possible, but there are many problems, which you probably will meet.
Good materials to read, to watch:
- Run a Single-Instance Stateful Application
- To run or not to run a database on Kubernetes: What to consider
- Базы данных и Kubernetes (обзор и видео доклада)
- Базы данных и Kubernetes (Дмитрий Столяров, Флант, HighLoad++ 2018)
Helm
Helm - package manager for Kubernetes. With Helm we can dynamically change parameters, deploy the application in multiple clusters.
Chart - package for Heml manager. Contains all resources to deploy in Kubernetes.
According to documentation:
## Create new chart with name "seed-app" in directory "./seed-app"
helm create seed-app

## some files in chart:
## - Chart.yaml - information about chart
## - value.yaml - default chart configuration
## - charts/ - chart dependencies. other charts required for current chart
## - templates/ - all resources which will be deployed in Kubernetes cluster
CLI:
## Deploy Helm package as installation with name "seed-app" from local directory
helm install seed-app ./seed-app
## https://helm.sh/docs/helm/helm_install/

## Deploy and redefine options in values.yaml files:
helm install --set seed.core.version=1.2.3  seed-app ./seed-app

## List all installed with Helm packages
helm list --all-namespaces

## Deployed package info and status
helm status seed-app
helm history seed-app

## Upgrade installed application with package changes
helm upgrade seed-app ./seed-app
## available options: --debug, --dry-run, --wait
## other options: https://helm.sh/docs/helm/helm_upgrade/#options

## Install with custom values "value-qa.yaml" in namespace "qa-env"
helm upgrade --install seed-app ./seed-app -f ./value-qa.yaml -n qa-env
## finally helm gets values from value.yaml and override it with values from value-qa.yaml

## Rollback to revision 3. revision number from history.
helm rollback seed-app 3

## Deploy with automatic rollback. "--atomic" flag
helm upgrade seed-app ./seed-app --atomic --timeout 20s --set seed.core.version=1.2.4

## Uninstall
helm uninstall seed-app -n qa-env
Test configuration:
## Check chart. Validate syntax errors
helm lint ./seed-app

## Build all yaml files LOCALLY and show results
helm template seed-app ./seed-app -f ./value-qa.yaml

## Build yaml configuration and validate this configuration in Kubernetes cluster
helm upgrade --install seed-app ./seed-app -f ./value-qa.yaml --dry-run
Create package:
## Create package
helm package ./seed-app

## Install from package
helm install seed-app ./seed-app-0.0.1.tgz -f ./path/to/custom/value-sit.yaml
Helm repositories:
## Add new repository
helm repo add reponame http://repo-path

## Update packages from repo
helm repo update

## Search chart in repository
helm search repo reponame/chart-name

## Download chart
helm pull reponame/chart-name
Example: Demo application
All sources for this example you can find in this repository: github.com/AGanyushkin/demo-k8s
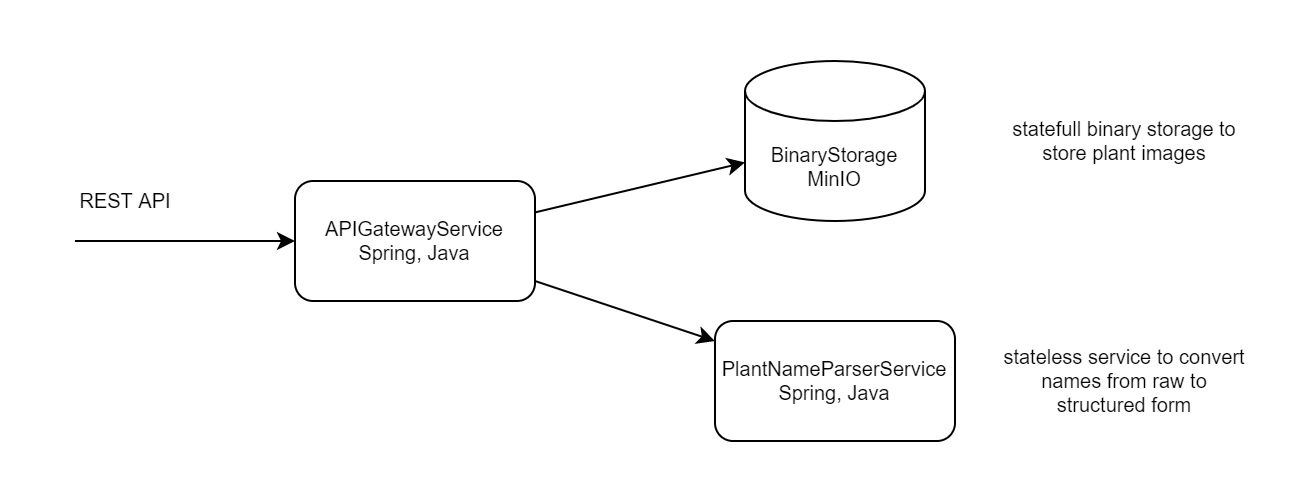
Demo application - it is one REST service "plant-name-parser-service", binary storage based on MinIO instance and api-gateway-service which based on Spring API Gateway and routes incoming requests to parser and binary storage.
In Kubernetes, I won't deploy MinIO as Pod in Kubernetes,
for this demo I am going to use extern MinIO service and create connection with <ExternalName> Service.
It is possible to use MinIO inside Kubernetes cluster, but maybe in another article.
Ingress in this configuration can replace APIGatewayService, but I will use both, just to test how it works.
Kubernetes Service for APIGatewayService is required, because I am using Ingress.
Finally, we have diagram for deployment:
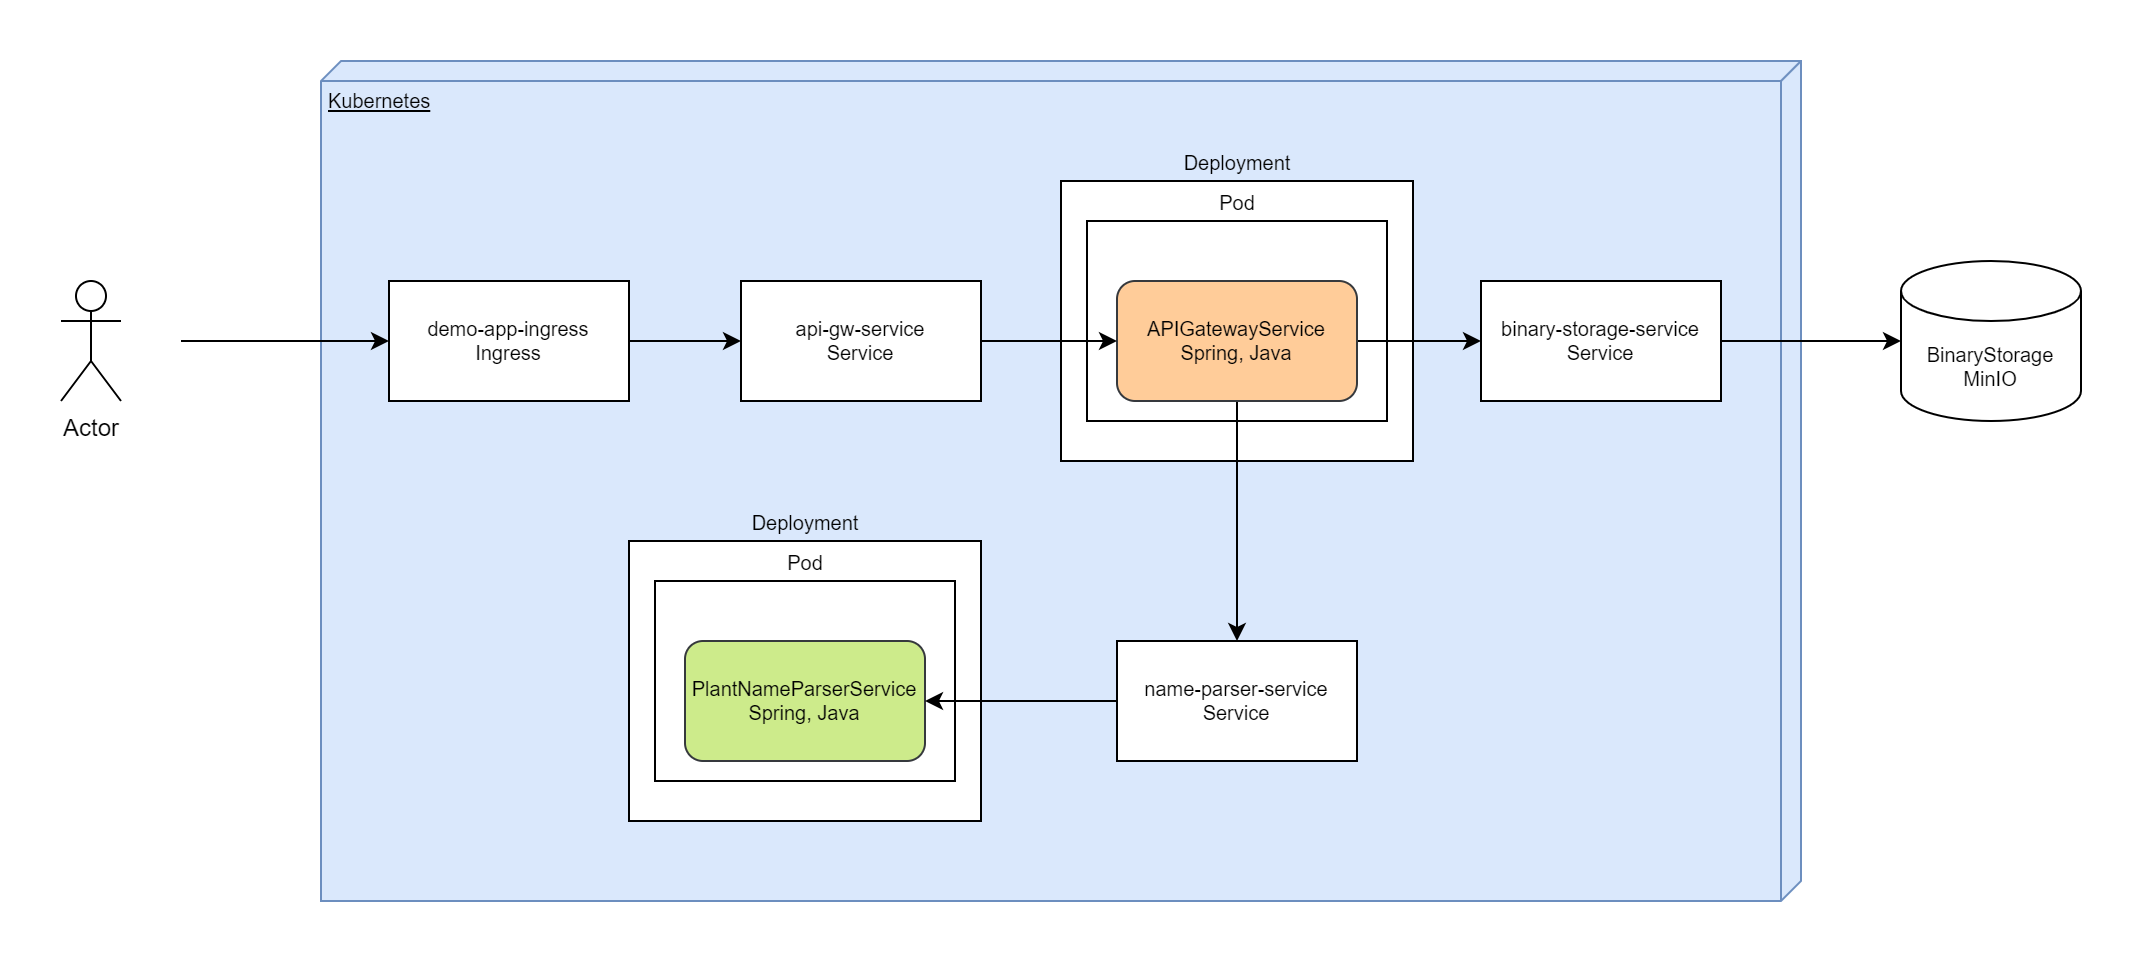
Image for parser service is available in dockerhub. Image for api-gateway you can build from sources: apigateway-service
Results:
- plant-name-parser.deployment.yaml
- api-gateway.deployment.yaml
- plant-name-parser.service.yaml
- api-gateway.service.yaml
- ingress.yaml
- binary-storage.service.yaml
Service "apigateway-service" make a requests to plant-name-parser and binary-storage, connections between these services provided with DNS names for Kubernetes services: "plant-name-parser-service" and "binary-storage-service".
Configuration for "apigateway-service" in Kubernetes cluster:
spring:
  cloud:
    gateway:
      routes:
        - id: name_parser_route
          uri: http://plant-name-parser-service:8080/
          predicates:
            - Path=/parser/**
          filters:
            - RewritePath=/parser/(?<segment>.*),/$\{segment}
minio:
  address: http://binary-storage-service:9000

## DNS names: "plant-name-parser-service" and "binary-storage-service"
"binary-storage-service" allows to access to MinIO which is hosted beyond the Kubernetes cluster:
apiVersion: v1
kind: Service
metadata:
  name: binary-storage-service
spec:
  type: ExternalName
  externalName: magni.midgard
"magni.midgard" - this is external DNS name in which MinIO is hosted.
Some tests:
#### Parse plant name
POST http://localhost/parser/api/v1/parse
Content-Type: application/json

{
"text": "betula pendula"
}

## Response:
## {
##   "genus": {
##     "text": "betula"
##   },
##   "species": {
##     "text": "pendula"
##   },
##   "subspecies": null,
##   "alternative": null,
##   "variety": null,
##   "cultivar": null,
##   "form": null
## }


#### Get image from binary storage
GET http://localhost/binary
All requests are working through Ingress (IngressController: localhost:80).
Links
Learn:
- Kubernetes Documentation
- Kubernetes Уроки
- Kubernetes на Русском Языке
- Открытая вечерняя школа. Kubernetes для разработчиков
Tools: